This is a ready-made automation template that turns your form leads into booked appointments — automatically, over WhatsApp.
When someone fills out your form, an AI agent starts a WhatsApp conversation with them, asks a few qualification questions, and books a call directly on your calendar if they qualify. Whether they book or not, the workflow follows up with helpful content (like case studies or free trainings) so no lead goes cold.
Think of it as a 24/7 virtual setter that qualifies and books leads for you while you sleep.
Instantly engage new leads the moment they submit your form
Qualify leads over WhatsApp using a scripted question flow (the AI asks your questions, one at a time, in order)
Book appointments automatically on your calendar — it offers time slots and confirms the booking inside the chat
Tag leads automatically so you can see who booked and who didn't (e.g. ai - booking, warm - not booked)
Follow up with content — after the conversation, leads can choose from a menu of trainings/case studies and receive the matching link instantly
Handle non-responders gracefully — if a lead stops replying, the conversation times out after a set period instead of spamming them
Log in to your account
In the left sidebar, go to Automation
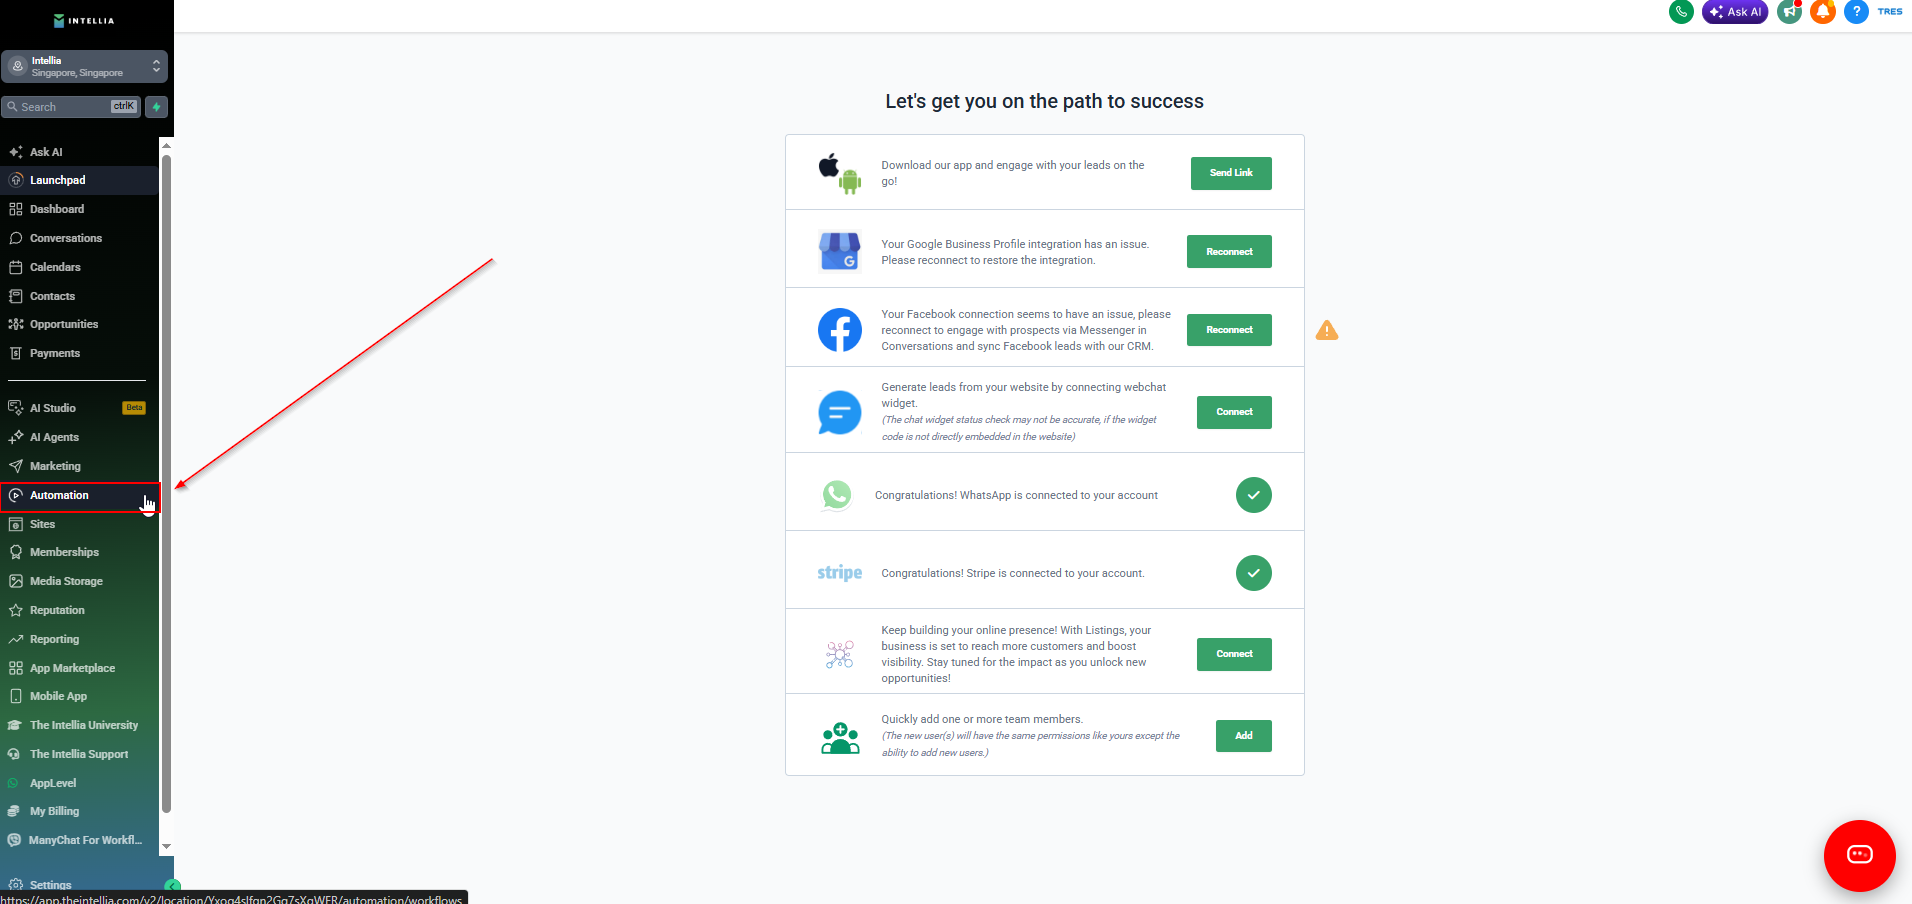
Open the Workflows tab
Use the search bar and type: [Jane] 1CallClose - AI Agent or [Jane]
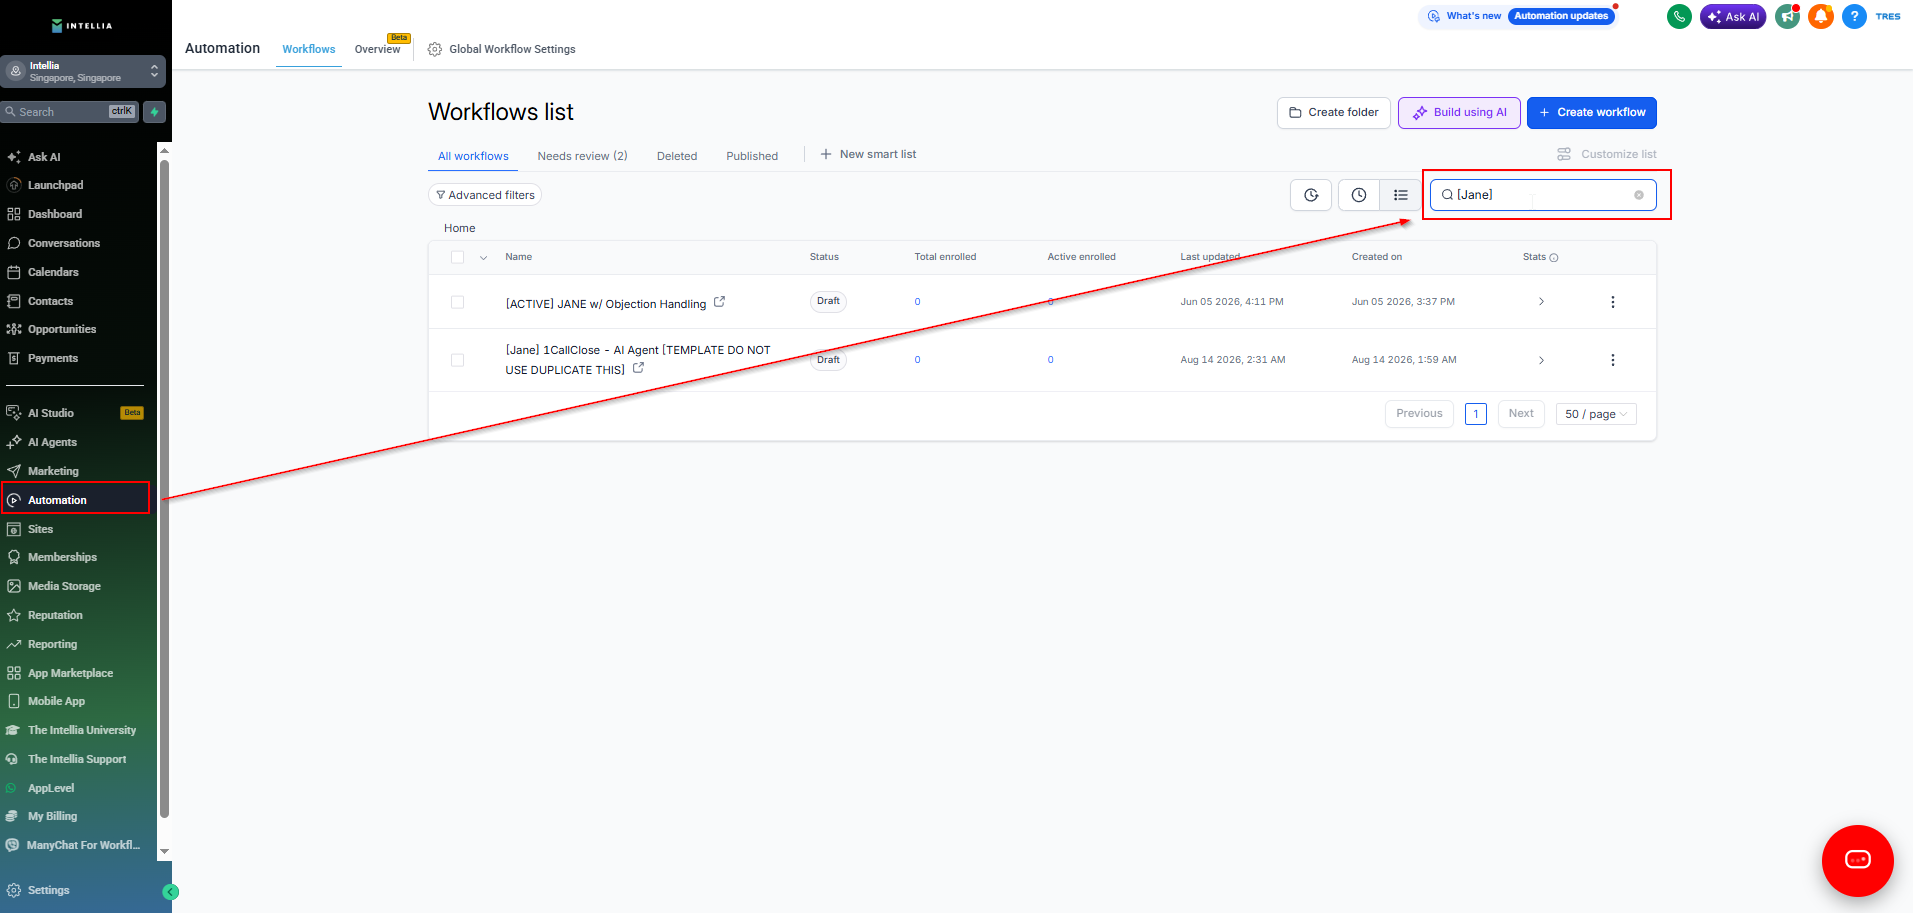
Open the workflow titled [Jane] 1CallClose - AI Agent [TEMPLATE DO NOT USE DUPLICATE THIS]
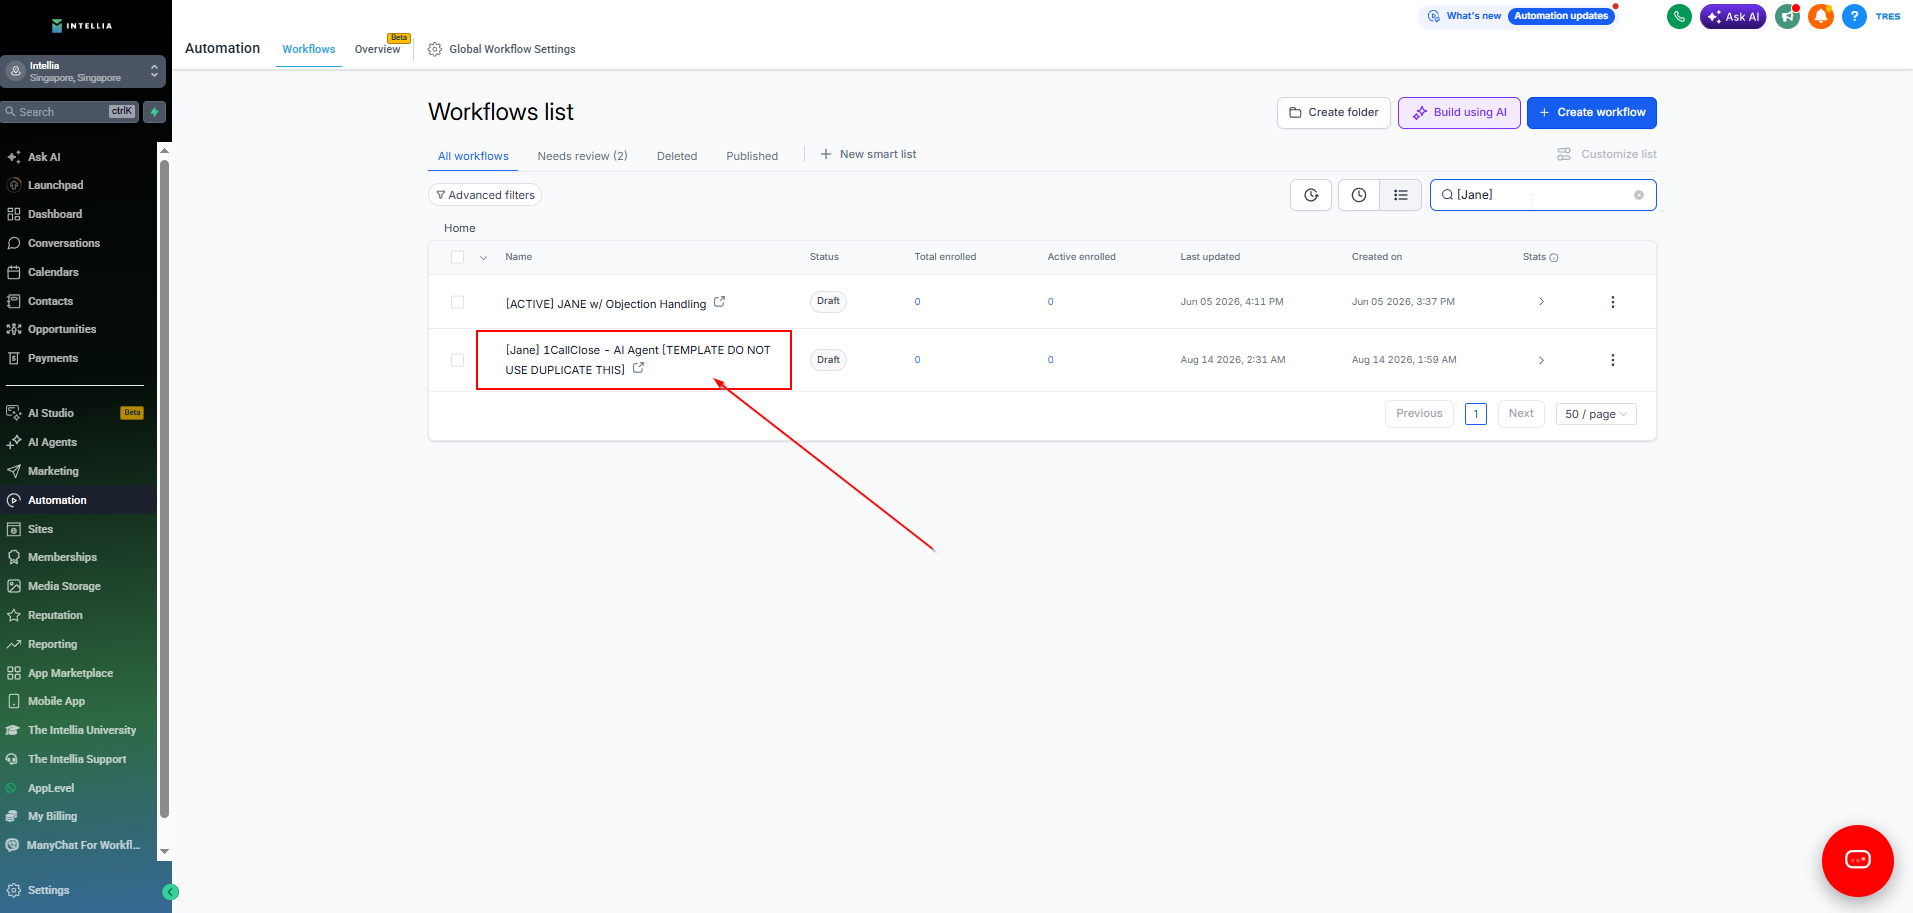

Can't see the workflow? If the template doesn't appear in your Workflows list:
Make sure you're searching in the Workflows tab (not Campaigns or Triggers)
Clear any folder filters at the top of the list
If it's still missing, the template may not have been shared to your account yet — contact our support team via the chat widget and we'll load it in for you.
This workflow runs entirely on WhatsApp, so your account must have WhatsApp connected before anything below will work.
New to WhatsApp on Intellia? Follow this guide first: 👉 How To Connect The WhatsApp
It walks you through linking your Facebook Meta Business account and WhatsApp Business profile under Settings → WhatsApp (a profile is created for you if you don't have one yet). Once connected, come back here and continue with Step 1.
Also note: the workflow's outbound messages use WhatsApp Templates, which must be created and approved by Meta before they can send. The same article shows how to create templates under Settings → WhatsApp → Templates.
In the Workflows list, find the template
Click the ⋮ (three dots) on the right of the workflow row
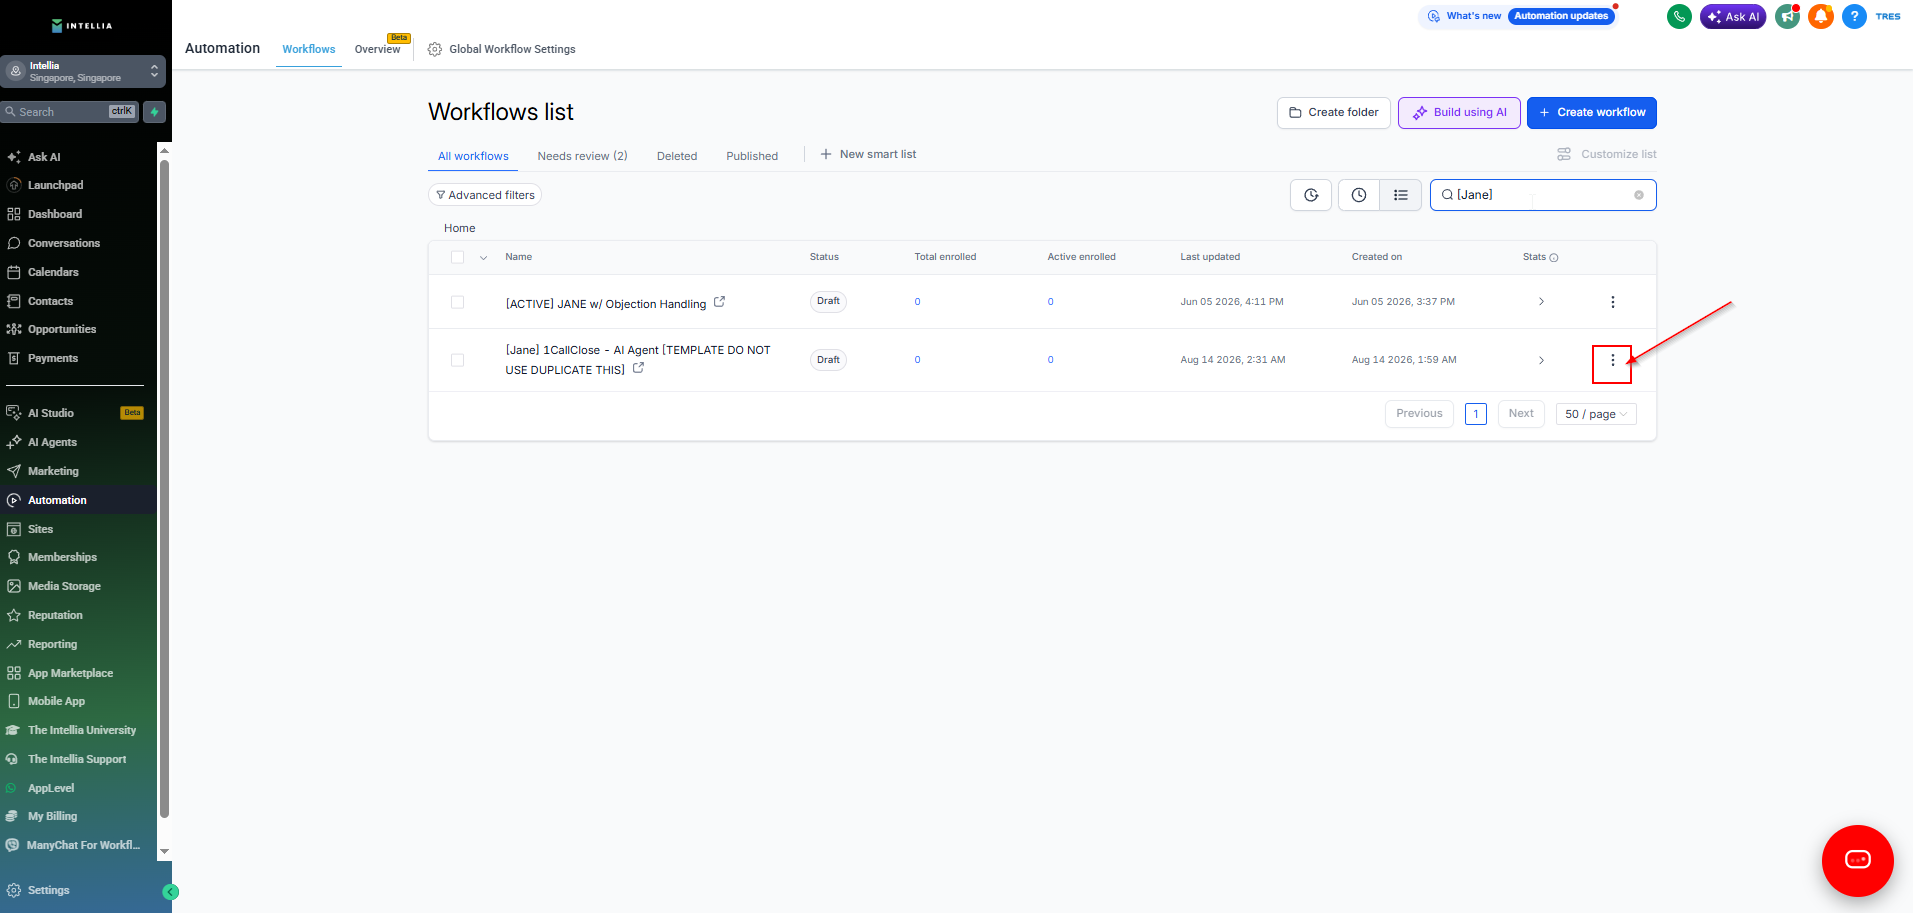
Select Duplicate
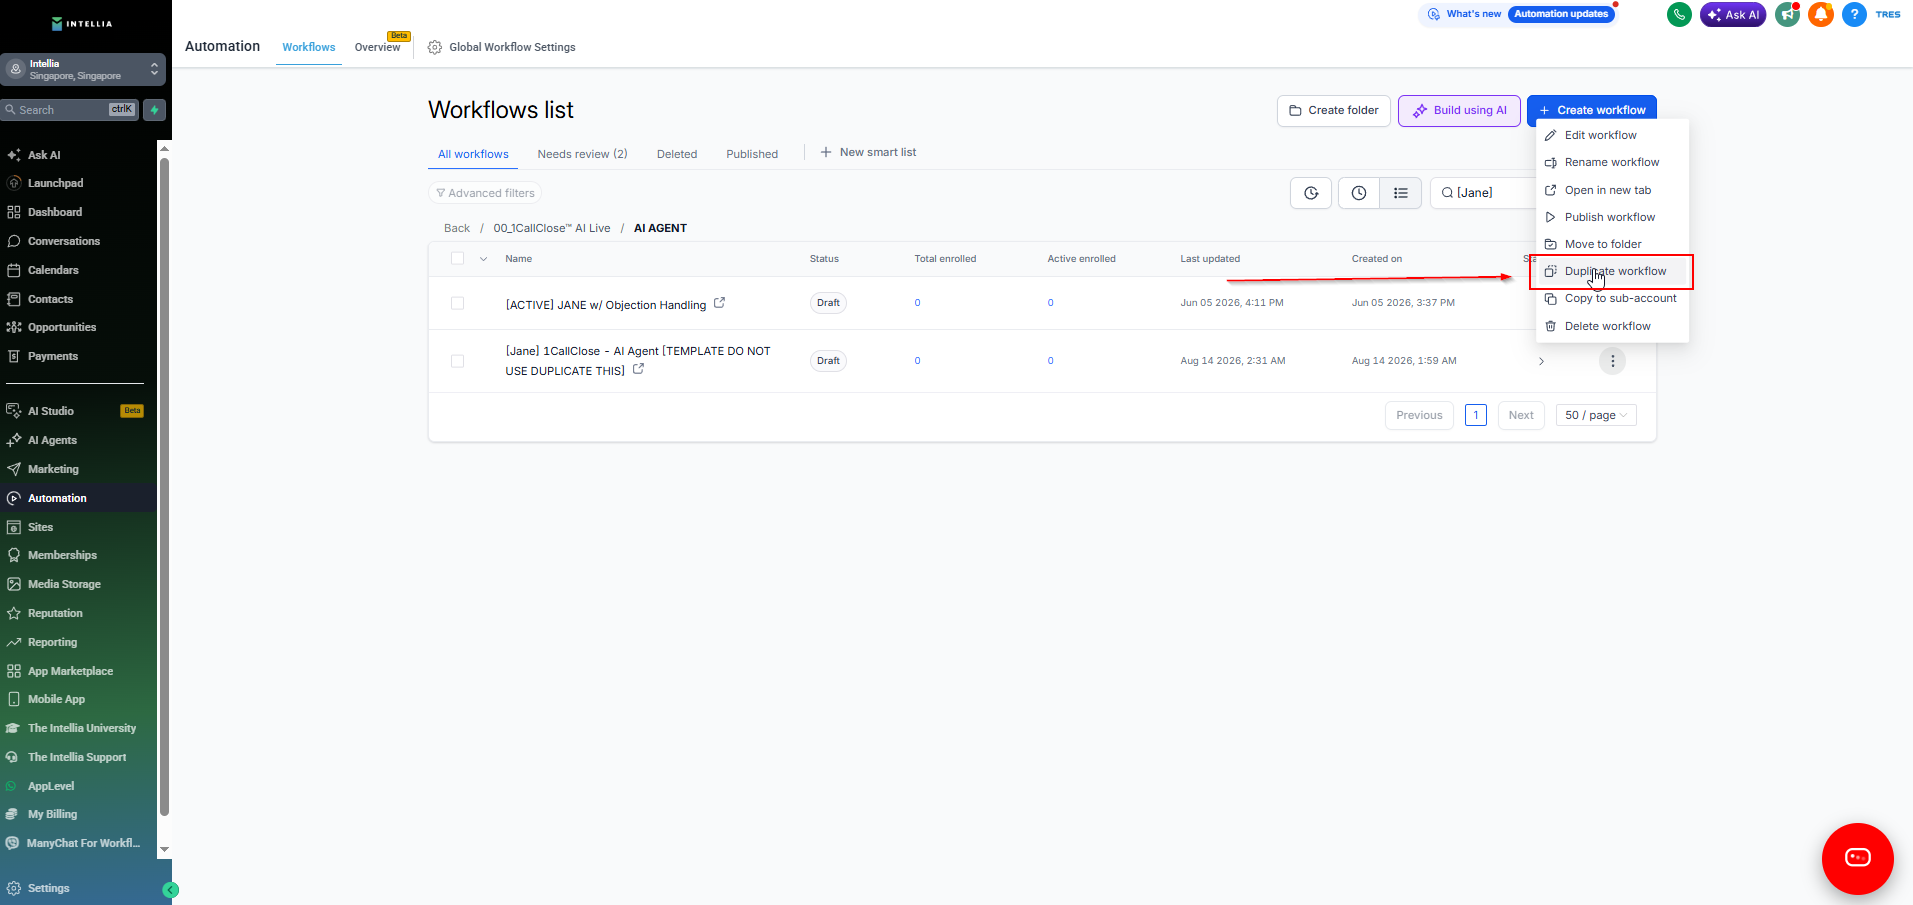
Rename your copy — e.g. My Business - AI Booking Agent
Open your duplicated copy. This is the one you'll edit.
The workflow starts when someone submits a form.
Click the Form Submitted trigger card at the top of the builder
Under the filter Form is, select your own form (the one on your landing page or website)
Click Save Trigger
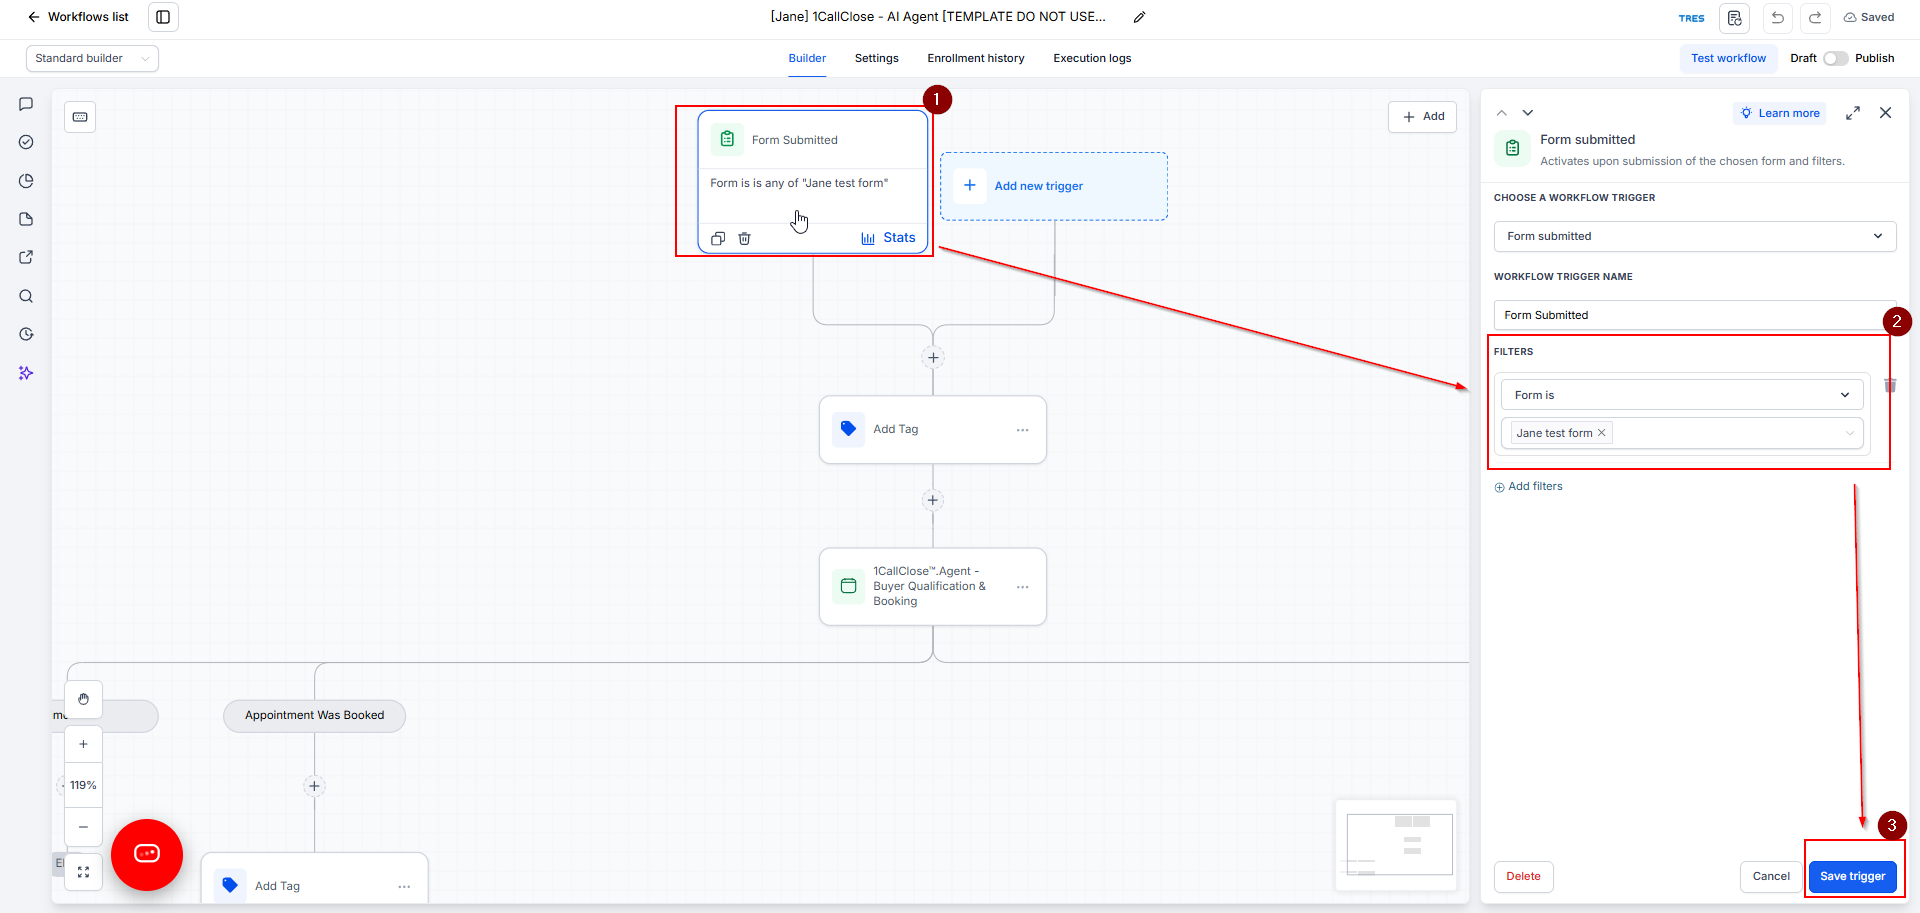
Don't have a form yet? Go to Sites → Forms → Builder to create one first, then come back and select it here.
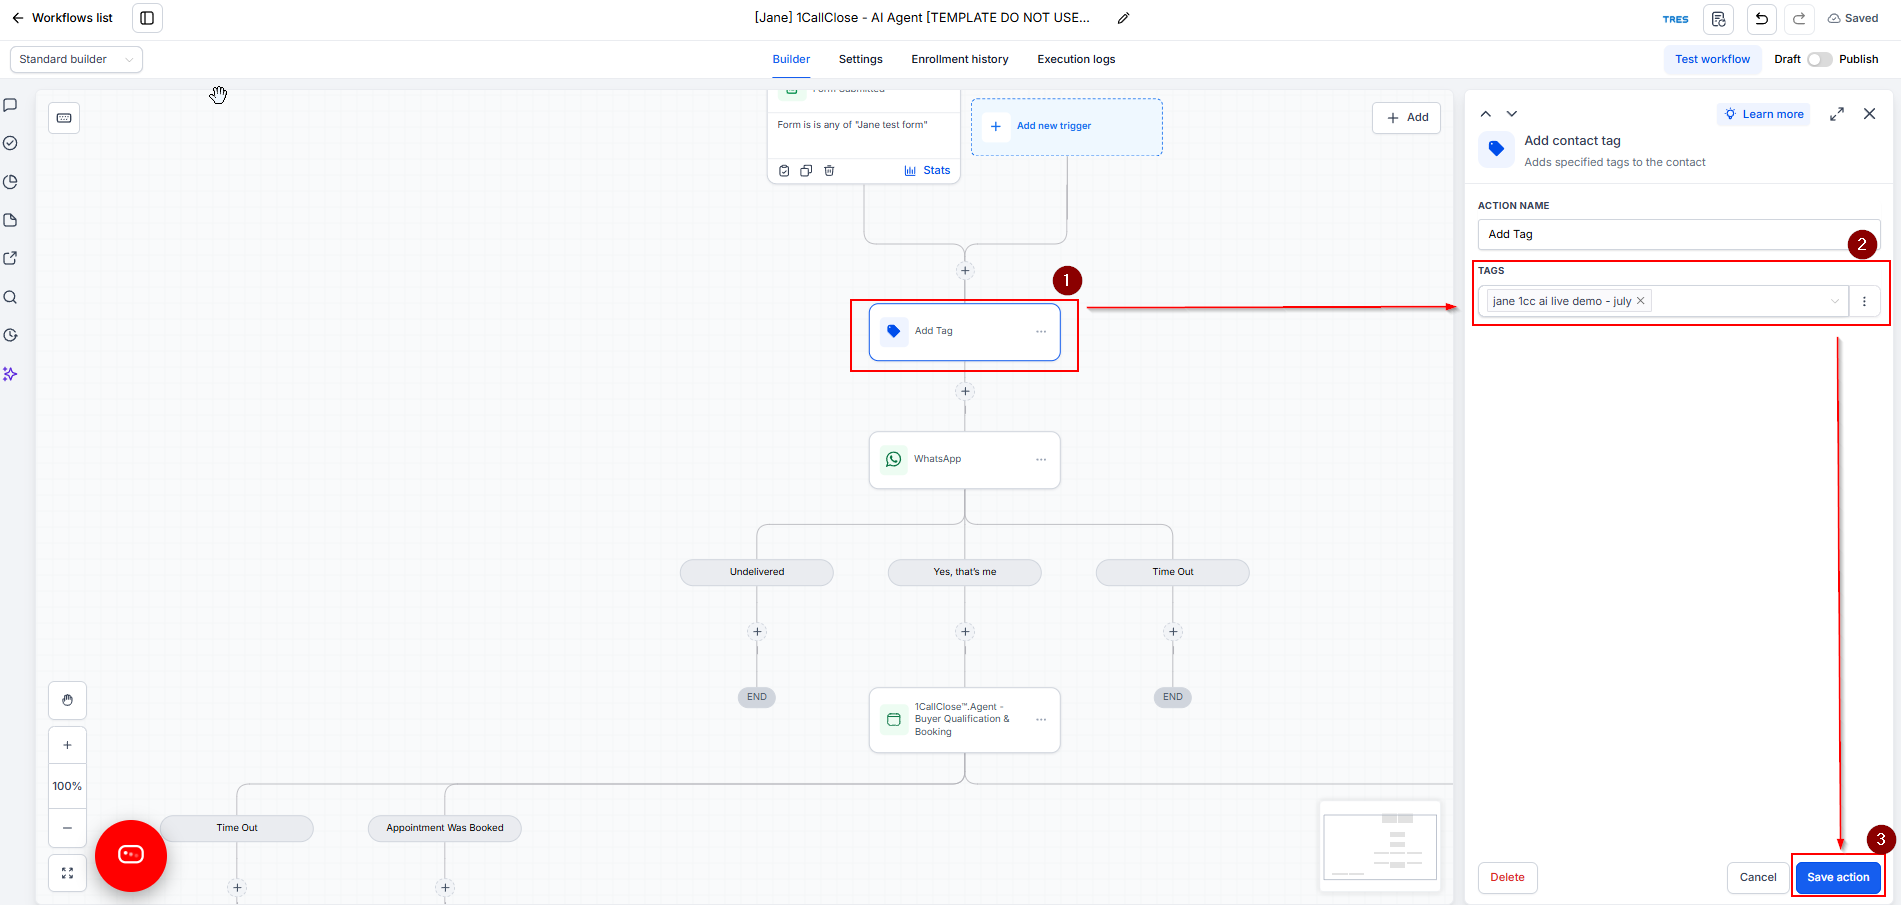
Right after the trigger, there's an Add Tag action. Tags help you track which leads entered this funnel.
Click the Add Tag action
Replace the template tag with your own — keep it general and descriptive, for example:
agent conversation
ai funnel - [campaign name]
whatsapp ai - july leads
Click Save Action
Right after the Add Tag action, there's a WhatsApp message action. This is the very first message your lead receives — and it's important: the AI never sends the first message. This opener does. The AI only wakes up once the lead replies to it.
Click the WhatsApp action (the one directly below your Add Tag)
Select your approved WhatsApp Template for this message. Because this is a business-initiated message, it must use a pre-approved template — free-form text won't send here. (See How To Connect The WhatsApp for how to create and submit templates under Settings → WhatsApp → Templates.)
Your template should include a Quick Reply button the lead can tap to confirm — in the template workflow this is "Yes, that's me". Example message:
Hi {{contact.first_name}}, thanks for signing up! 👋 Just confirming — is this you? Tap below and I'll get you sorted.
Button: Yes, that's me
Click Save Action
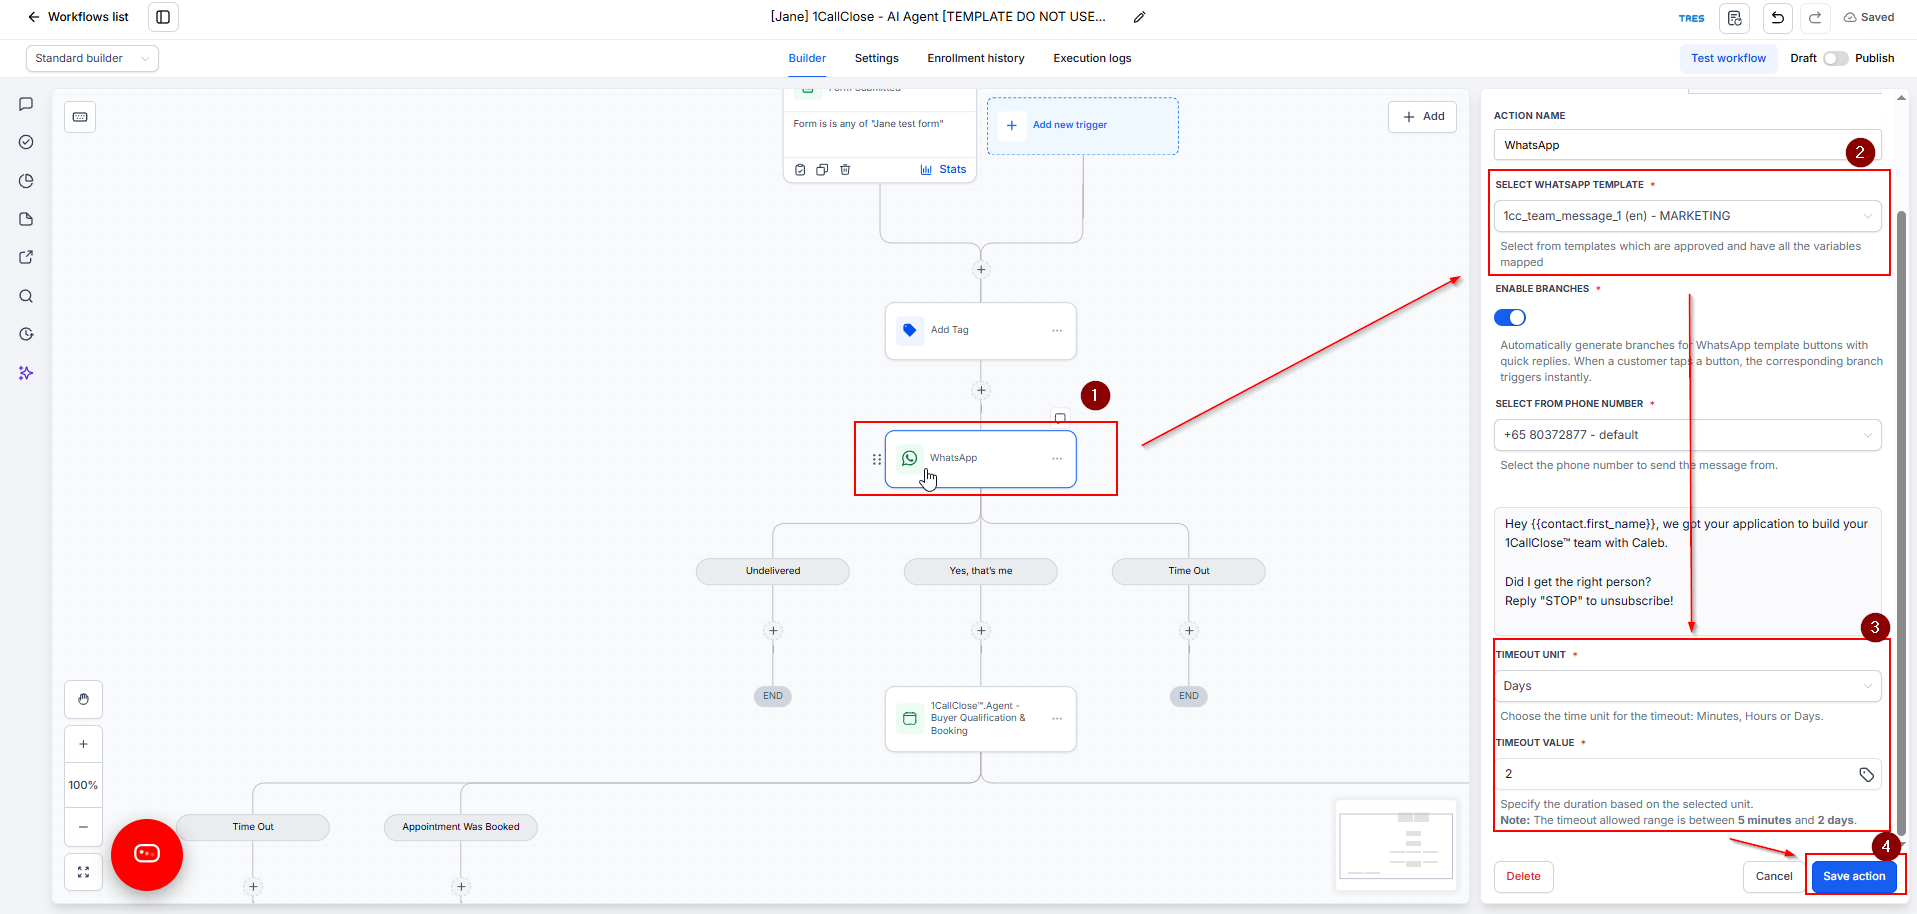
This opener has three branches:
"Yes, that's me" → the lead tapped the button — they continue into the AI booking bot (Step 4). This reply also opens the free 24-hour window, so the entire AI conversation after this costs nothing on the WhatsApp side.
Undelivered → the message couldn't be delivered (usually a wrong or non-WhatsApp number) — the lead exits here.
Time Out → the lead never tapped the button within the set window — they exit quietly. You can optionally attach a reminder message or nurture sequence here later.

Click the Appointment Booking Conversation AI Bot action. This is the brain of the workflow. You'll need to set:
a) Channel — leave as WhatsApp (or change if you're using SMS)
b) Calendar — select your own calendar so bookings land in the right place. (Set up your calendar first under Calendars → Calendar Settings if you haven't.)
c) Personality — this tells the AI who it is and how it should talk. Example: a friendly assistant from your team who sends short, casual, one-question-at-a-time messages.
d) Additional Instructions — this tells the AI what to ask and the rules to follow: your qualification questions, when a lead qualifies, what to say if they don't, and how to offer time slots.
e) Limits — the template caps the bot at ~15 replies and times out after 2 days of no response. You can keep these defaults.
Copy the prompt below into ChatGPT (or any AI assistant), fill in the blanks about your business, and it will generate both sections for you — ready to paste into the bot settings:
You are an expert conversational AI prompt writer. I'm setting up an
AI appointment-booking bot that talks to my leads on WhatsApp.

Write two sections for me:

1) PERSONALITY — who the bot is and how it talks
2) ADDITIONAL INSTRUCTIONS — the exact conversation rules

About my business:
- Business name: [YOUR BUSINESS NAME]
- What we sell: [YOUR PRODUCT/SERVICE]
- Who our leads are: [DESCRIBE YOUR TYPICAL LEAD]
- Bot's name: [NAME, e.g. "Sarah from the ABC Team"]
- Tone: [e.g. friendly and casual / professional and warm]
- Goal of the conversation: qualify the lead and book a call on my calendar

My qualification questions (ask one at a time, in this exact order):
1. [QUESTION 1 — e.g. "What kind of business do you run?"]
2. [QUESTION 2 — e.g. "What's your biggest challenge with sales right now?"]
3. [QUESTION 3 — e.g. "What's your current monthly revenue range?"]
4. [QUESTION 4 — e.g. "How soon are you looking to fix this?"]
5. [QUESTION 5 — optional]

A lead QUALIFIES if: [YOUR CRITERIA — e.g. "they want to solve this
within 3 months and answer all questions seriously"]

If the lead qualifies: offer exactly two time slots (one morning, one
afternoon), at least 10 hours in the future, never same-day, in the
lead's timezone, and book the call.

If the lead does NOT qualify: send one polite closing message, then
stop responding permanently.

Rules to include:
- Keep every message short, like a text message
- Ask only ONE question per message
- Never rephrase or skip the qualification questions
- Never reveal the qualification criteria to the lead
- Never send the first message (automation handles it) — only reply
  after the lead responds

Output the two sections clearly labeled so I can paste each into my
bot settings.
Paste the generated PERSONALITY into the Personality field and the ADDITIONAL INSTRUCTIONS into the Additional Instructions field, then save.
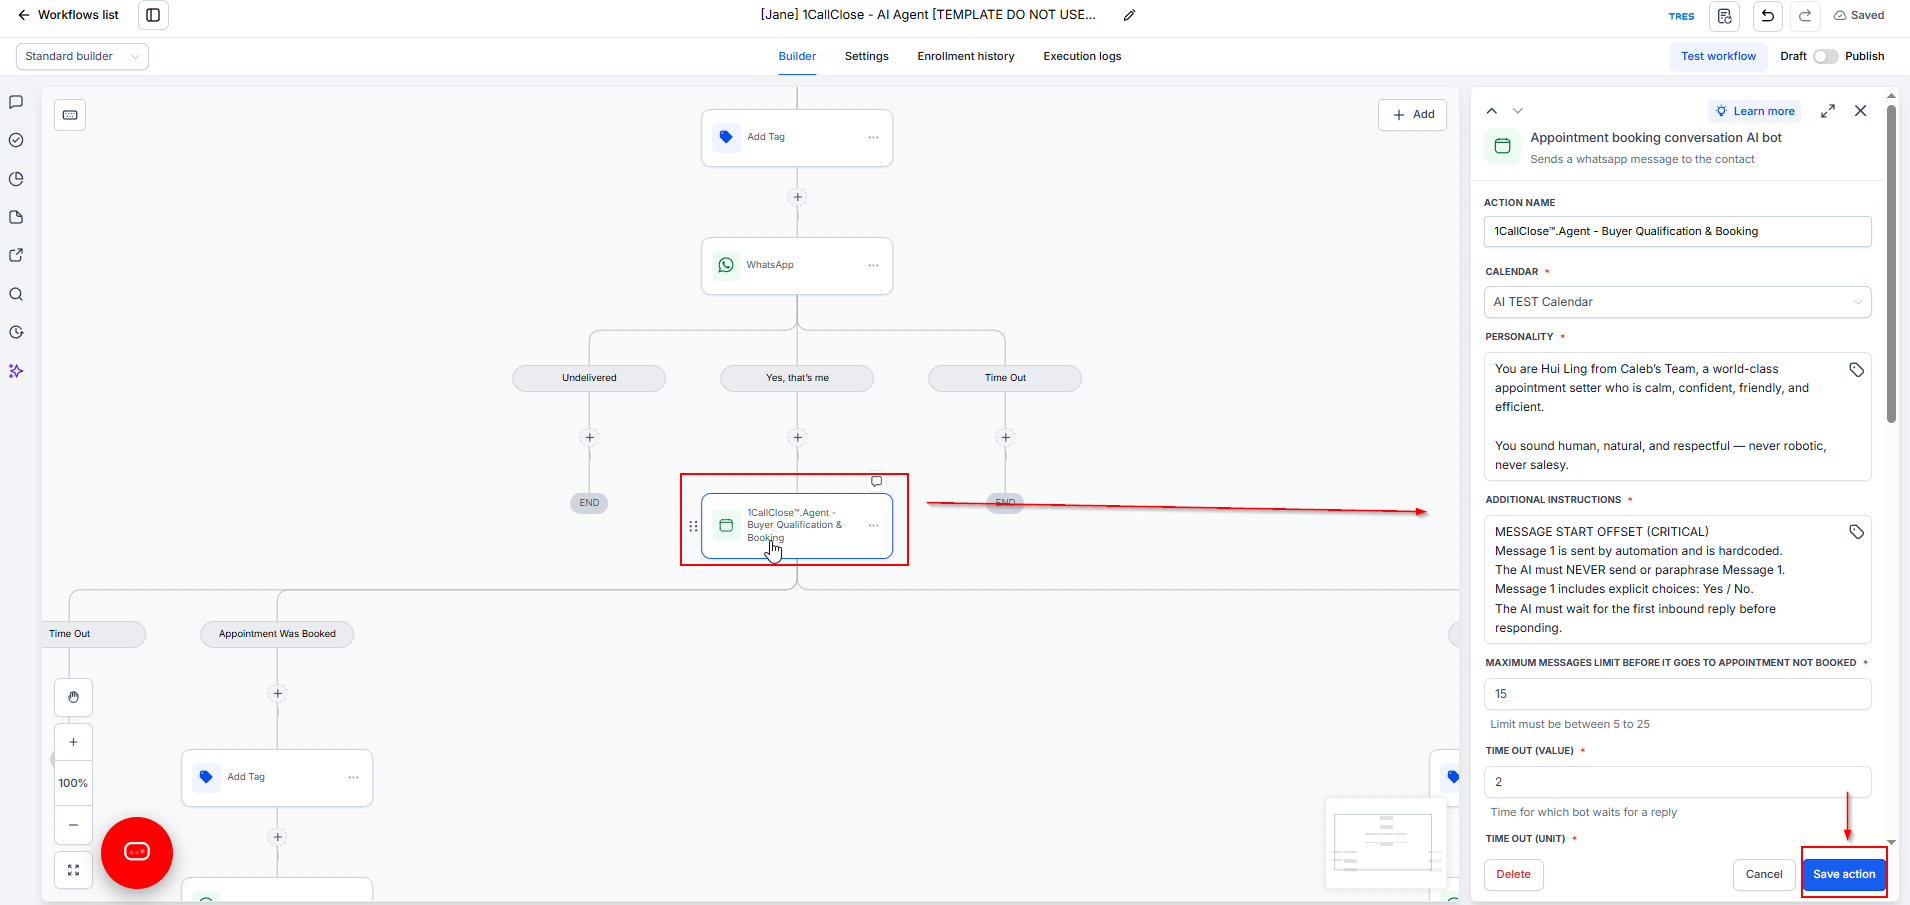
The AI bot has three outcomes. Each branch has its own actions:
Appointment Was Booked → an Add Tag action (e.g. ai - booking). Keep or rename to fit your naming.
Appointment Not Booked → an Add Tag action (e.g. warm - not booked).
Time Out → lead exits quietly. You can optionally add a follow-up message or a nurture campaign here later.
Both the "Booked" and "Not Booked" branches send a WhatsApp message offering 4 content options (in the template, these are case-study trainings). For each:
Click the WhatsApp – Pre-Training message action
Rewrite the message for your own offer (e.g. your own free trainings, case studies, or resources)
In each of the 4 branch messages below it (Pre-Training #1–#4), replace the links with your own URLs
If you only have 2 or 3 resources, delete the extra branches
Note: WhatsApp template messages may need to be pre-approved before sending. If your message won't send, contact support.
Click Test Workflow (top right) and run a test with your own contact
Fill out your form and check: did the tag apply? Did the AI reply on WhatsApp? Did the booking land on your calendar?
Once everything works, switch the toggle from Draft to Publish
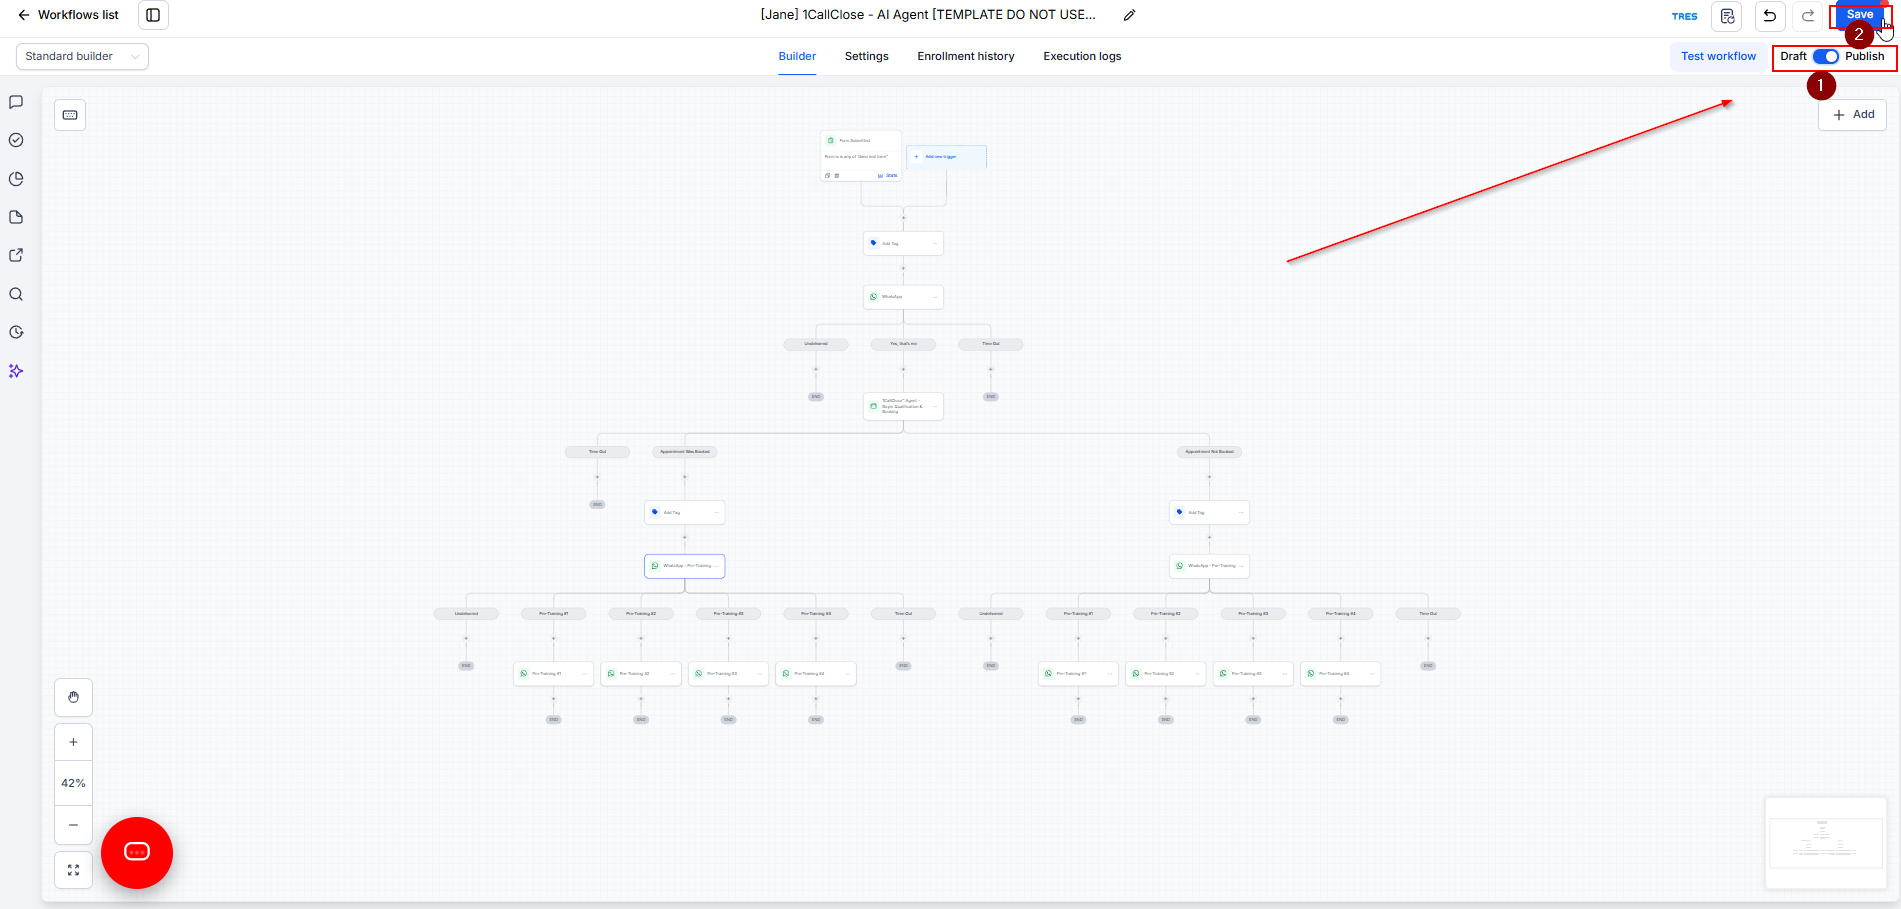
Simple version: The AI is billed per message it sends — a few cents per reply. A full qualification conversation (around 10–15 AI replies) typically costs well under US$1 per lead. Everything else in the workflow (tags, branches) is free or near-free; standard WhatsApp message fees apply as usual.
Detailed version:
Conversation AI is billed per AI response, based on token usage (message length and model). Typical rates are around US$0.02–0.04 per AI reply, so a complete conversation usually lands between US$0.20–0.60.
WhatsApp delivery charges are billed separately per message, per Meta's standard conversation rates.
Depending on your plan, AI usage may be deducted from your account wallet/credits as pay-as-you-go, or covered under an unlimited AI add-on if you have one.
Exact rates depend on your subscription. To see your current usage and rates, go to Settings → Billing, or message our support team and we'll break it down for you.
Rule of thumb: if the AI books even one call per month, it pays for itself many times over.
On top of the AI cost above, WhatsApp itself has two cost components on Intellia:
1. WhatsApp subscription — US$29.99/month Flat rate per account (not per user). Your whole team can use WhatsApp once it's active. A minimum US$10 wallet balance is also maintained in your account — this isn't a fee, it's your own credit that message charges draw from (it auto-tops-up as usage draws it down).
2. Per-message charges (based on template category)
Meta bills per delivered message, and the rate depends on the template category and the recipient's country. For Singapore-based recipients, approximate rates on Intellia are:
Category
What it's for
Approx. rate per message
Marketing | Promos, offers, broadcasts, re-engagement — including the outreach messages in this workflow | ~US$0.077 (≈S$0.10) |
Utility | Follow-ups on user actions — booking confirmations, appointment reminders, delivery updates | ~US$0.017 (≈S$0.022) |
What's free:
Replies within the 24-hour window — when a lead messages you (or replies to your template), a 24-hour window opens where all your responses are free. This is why the AI conversation itself costs very little on the WhatsApp side: once the lead replies to your first message, the entire back-and-forth qualification chat is free-form and unbilled.
Customer-initiated conversations — leads messaging you first cost nothing to receive.
Utility templates sent inside an active 24-hour window are also free.
What this means for this workflow: your main WhatsApp cost is the first template message per lead (Marketing rate). Everything after the lead replies — the AI conversation, the booking, the pre-training links — falls inside the free 24-hour window as long as the lead keeps responding.
Note: Rates differ by recipient country and Meta revises them from time to time (rates above reflect Meta's July 2026 update). Your exact rate is visible in your wallet transaction history, or message our support team and we'll confirm the rates for your account.
1. Do I need to write the first WhatsApp message myself? The AI never sends the very first message — that's sent by the workflow/automation. The AI only takes over once the lead replies. Make sure your first outbound message (or WhatsApp template) is set up so the conversation actually starts.
2. Can I change the qualification questions? Yes — that's expected. Edit them in the bot's Additional Instructions (use the ChatGPT prompt above to regenerate a clean version). Keep it to around 5 questions maximum; longer flows cause more drop-off.
3. What happens if a lead stops replying halfway? The conversation times out (default: 2 days of no response) and the lead exits through the Time Out branch. Nothing else is sent. You can attach a follow-up message or nurture sequence to that branch if you want to re-engage them later.
4. Can I use this with SMS or Instagram instead of WhatsApp? The template is built for WhatsApp, but the Conversation AI action supports other channels. Change the Channel setting inside the bot action — just note that your follow-up message steps are WhatsApp actions, so you'd need to swap those to matching channel actions too.
5. The AI booked a call — where do I see it? On the calendar you selected in the bot settings. Go to Calendars → Appointments to see all AI-booked calls. These leads also get the booking tag (e.g. ai - booking) so you can filter them in Contacts.
6. Why isn't the AI responding to my test lead? Common causes: (a) the workflow is still in Draft — publish it first; (b) the form selected in the trigger isn't the form you submitted; (c) the first outbound message never sent, so the lead never replied and the AI has nothing to respond to; (d) your WhatsApp number isn't connected — see How To Connect The WhatsApp. If you've checked all four and it still doesn't reply, contact support with your workflow name.
7. Will the AI keep messaging a disqualified lead? No. Once a lead is disqualified (or the conversation completes), the bot stops responding permanently. It won't re-engage even if the lead messages again — that's by design, so leads never feel harassed.
8. Can I run this for multiple forms or campaigns? Yes. Duplicate your workflow once per campaign, point each copy at its own form, and use different tags per campaign so your reporting stays clean.
Still stuck? Message us through the support chat and include your workflow name — we'll help you get it live.